

The Baking Chocolate Checkers recipe falls under the category of desserts and baked goods. It specifically belongs to the cuisine of sweet treats and desserts. While the concept of checkers, a board game, is not associated with any particular cuisine, the recipe itself is a classic chocolate cake recipe with a chocolate glaze.
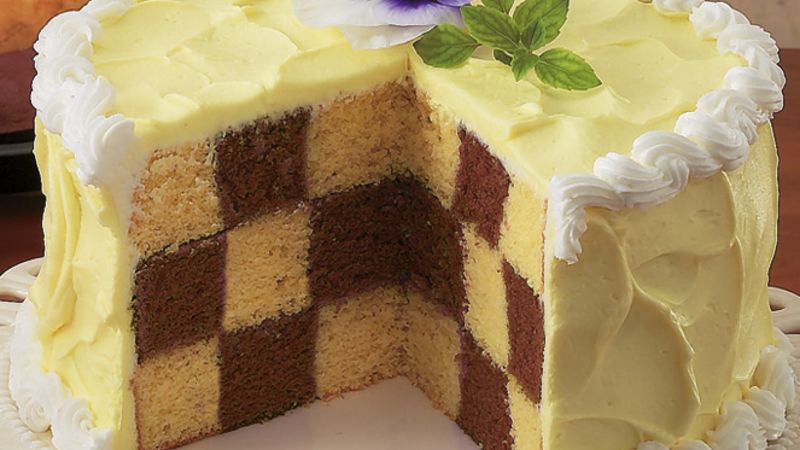
Baking Chocolate Checkers Recipe
Chocolate desserts are enjoyed in various cuisines around the world, and this particular recipe can be considered part of a broader international dessert repertoire. Chocolate cakes are popular in many culinary traditions, including American, European, and other global cuisines.The Baking Chocolate Checkers recipe can be prepared and enjoyed by individuals who appreciate chocolatey desserts, regardless of the specific cuisine they follow.
Ingredients
- 2 cups all-purpose flour
- 2 cups granulated sugar
- 3/4 cup unsweetened cocoa powder
- 2 teaspoons baking powder
- 1 1/2 teaspoons baking soda
- 1 teaspoon salt
- 1 cup milk
- 1/2 cup vegetable oil
- 2 large eggs
- 2 teaspoons vanilla extract
- 1 cup boiling water
For the frosting:
Instructions
- Preheat your oven to 350°F (175°C). Grease and flour two 9-inch round cake pans.
- In a large mixing bowl, sift together the flour, sugar, cocoa powder, baking powder, baking soda, and salt. Make sure they are well combined.
- Add the milk, vegetable oil, eggs, and vanilla extract to the dry ingredients. Beat the mixture with an electric mixer on medium speed for about 2 minutes. The batter should be smooth and well blended.
- Reduce the speed of the mixer and carefully pour in the boiling water. Mix until the water is fully incorporated. The batter will be thin, but that's normal.
- Divide the batter equally between the prepared pans. Place the pans in the preheated oven and bake for 30 to 35 minutes, or until a toothpick inserted into the center comes out clean.
- Once baked, remove the pans from the oven and allow the cakes to cool in the pans for about 10 minutes. Then transfer the cakes to a wire rack to cool completely.
- While the cakes are cooling, prepare the frosting. In a mixing bowl, cream the softened butter. Add the cocoa powder, powdered sugar, milk, and vanilla extract. Beat on low speed until the ingredients are combined, then increase the speed to medium and continue beating until the frosting is smooth and fluffy.
- 8. Once the cakes are completely cooled, place one cake layer on a serving plate. Spread a generous amount of frosting on top of the layer. Place the second cake layer on top and frost the top and sides of the cake with the remaining frosting.
- For the checkered pattern, you can decorate the top of the cake with alternating squares of white and dark chocolate frosting. You can use a piping bag fitted with a small round tip to create the squares or simply spread the frosting in a checkerboard pattern.
- Once decorated, let the cake sit for a while to allow the frosting to set. Then it's ready to be sliced and enjoyed!
- That's it! You now have a delicious homemade chocolate cake with a checkered design. Enjoy!
Video
Notes
- Ensure that the butter is softened but not melted for proper creaming with sugar.
- Use high-quality cocoa powder for a rich chocolate flavor in the cake.
- Adjust the amount of sugar based on your desired level of sweetness.
- Adding chopped nuts like walnuts or pecans can provide a delightful crunch and additional flavor to the cake.
- You can also add a teaspoon of instant coffee granules to enhance the chocolate flavor.
- Feel free to experiment with different mix-ins like chocolate chips or dried fruits for added texture and variety.
Nutrition
Serving: 100g
Tried this recipe?Let us know how it was!
Lillian
Lillian loves to try her hands on new recipes. Don't let anyone convince you otherwise: food is the way to everyone's heart.